Calibrate robotic arm joint
Note: The Jetcobot robotic arm has been calibrated before leaving the factory. Please do not calibrate it unless necessary. If you must calibrate the robotic arm, please follow the instructions in this tutorial.
This course calibrates the six joints of the robotic arm, but does not include calibrating the gripper.
1. API Introduction
release_all_servos()
Function : Release the torque of all joints of the robotic arm. After release, the robot arm will no longer maintain the posture, and the robotic arm can be changed by hand.
Parameter explanation:
- Return value: None
set_servo_calibration()
Function: Set the current servo angle to zero.
Parameter explanation:
- Return value: None
2.About code
Code path:~/jetcobot_ws/src/jetcobot_calibration/scripts/cali_joints.ipynb
Create three new buttons to control the release, calibration, and reading functions of the robotic arm.
# Read robotic arm joint angles
button_Read = widgets.Button(
description='Read',
button_style='info', # 'success', 'info', 'warning', 'danger' or ''
tooltip='Description',
icon='uncheck' )

# Calibrate robotic arm
button_Calibration = widgets.Button(
description='Calibration',
button_style='success', # 'success', 'info', 'warning', 'danger' or ''
tooltip='Description',
icon='uncheck' )

# Release robotic arm
button_Release = widgets.Button(
description='Release',
button_style='danger', # 'success', 'info', 'warning', 'danger' or ''
tooltip='Description',
icon='uncheck' )

# Handle button click events
def on_button_clicked(b):
with output:
print("Button clicked:", b.description)
if b.description == 'Read':
with output:
print("read joints:", mc.get_angles())

elif b.description == 'Calibration':
for i in range(1, 7):
mc.set_servo_calibration(i)
time.sleep(1)
mc.power_on()
with output:
print("calibration complete")
elif b.description == 'Release':
mc.release_all_servos()

# Register button callbacks
button_Read.on_click(on_button_clicked)
button_Calibration.on_click(on_button_clicked)
button_Release.on_click(on_button_clicked)
3.Run program
Click the button on the jupyterlab toolbar to run the entire program, and then pull it to the bottom.
![]()
After running the program, we can see three buttons.
![]()
Click the [Release] button to release the torque of the robotic arm and put the robot arm in a free twisting state.
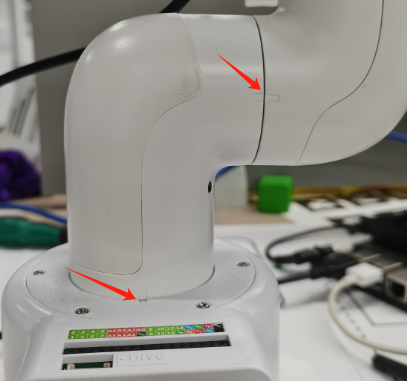
Then, align the calibration points of the six joints of the robotic arm with joints 1 and 2, as shown in the figure below.
For other joints, please check the corresponding positions of the joints on the robotic arm.
After confirming that the calibration points of the six joints are aligned, click the [Calibration] button to start calibration, which takes about a few seconds.
Do not change the posture of the robot arm before receiving the [calibration complete] prompt.
After the calibration is completed, the [calibration complete] prompt will be printed, and the robot arm will be powered on and the posture will be fixed.

At this time, click [Read] to read the angle of the robotic arm. If the read angle values are all around 0°, the calibration is complete.